Skull Container
Happy Wednesday!
Today's project was a rather hard one to complete but after I was done I was really happy with the turnout! It's inspired by Christine McConnell
Apparently I missed the bandwagon on her Netflix series but I follow her on You Tube and Instagram she's vintage meets spooky and I am here for it!!
Christine made a skull container and I badly wanted to attempt one of my own on a cheaper level. With some materials from my stash and the $ Tree I was able to achieve it!
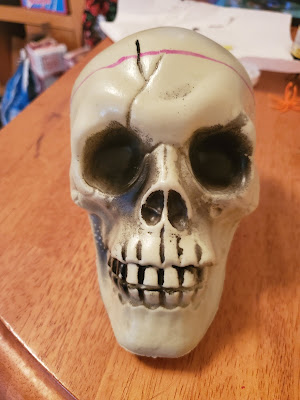
I started off with a plastic skull:
I took a tape measure, wrapped it around his cranium then marked around it. This is where the lid will be. Next I took sharp scissors to cut off a lid:
From my stash, I found some gem stones to place in the eye sockets, and one on his forehead.
For the lid, I wanted a handle to make things easier again from my stash I found a big cork (pro tip if you drink wine, etc save your corks!) I added a gem on top, then covered it with clear glitter paint.
This was the hardest part and probably why I didn't photograph it. I wanted to line the inside with material, I got a fat corner from Wal-Mart (.97 cents) I cut it in pieces to fit inside the skull and used Aleene's fabric glue to attach. It was very difficult to do it along with dry time. I did all but the where the eye sockets were. I do want to make another one but I think I plan to spray that one.
Next, I took some of the same glitter paint and covered the skull with it. I probably could have left the skull plain but it was fun to cover it in glitter paint:
The other hard part, I discovered was the base to attach the skull. I picked up a candle holder from $ Tree and attempted to attach it with E6000/Hot Glue and that DID NOT work:
Believe it or not, my skull was a tad top heavy (I KNOW!!) so he would not stay on the little base. Going back to my stash, I found a cardboard coaster to attach to the base:
I painted it black, then attached the skull to it. I had to line the bottom of the skull with a piece of paper too to help attachment (again it was very frustrating).
Here's the finished product:
He resides in my bathroom and I store my spooky hair flowers in them!!
I am hoping to make another one before Halloween is over!
Miss Mag Nificent
Today's project was a rather hard one to complete but after I was done I was really happy with the turnout! It's inspired by Christine McConnell
Apparently I missed the bandwagon on her Netflix series but I follow her on You Tube and Instagram she's vintage meets spooky and I am here for it!!
Christine made a skull container and I badly wanted to attempt one of my own on a cheaper level. With some materials from my stash and the $ Tree I was able to achieve it!
I started off with a plastic skull:
I took a tape measure, wrapped it around his cranium then marked around it. This is where the lid will be. Next I took sharp scissors to cut off a lid:
 |
| He didn't feel a thing |
From my stash, I found some gem stones to place in the eye sockets, and one on his forehead.
For the lid, I wanted a handle to make things easier again from my stash I found a big cork (pro tip if you drink wine, etc save your corks!) I added a gem on top, then covered it with clear glitter paint.
 |
| I for some reason didn't show my process decorating the cork |
This was the hardest part and probably why I didn't photograph it. I wanted to line the inside with material, I got a fat corner from Wal-Mart (.97 cents) I cut it in pieces to fit inside the skull and used Aleene's fabric glue to attach. It was very difficult to do it along with dry time. I did all but the where the eye sockets were. I do want to make another one but I think I plan to spray that one.
Next, I took some of the same glitter paint and covered the skull with it. I probably could have left the skull plain but it was fun to cover it in glitter paint:
The other hard part, I discovered was the base to attach the skull. I picked up a candle holder from $ Tree and attempted to attach it with E6000/Hot Glue and that DID NOT work:
 |
| Before he fell over |
Believe it or not, my skull was a tad top heavy (I KNOW!!) so he would not stay on the little base. Going back to my stash, I found a cardboard coaster to attach to the base:
I painted it black, then attached the skull to it. I had to line the bottom of the skull with a piece of paper too to help attachment (again it was very frustrating).
Here's the finished product:
He resides in my bathroom and I store my spooky hair flowers in them!!
I am hoping to make another one before Halloween is over!
Miss Mag Nificent


Comments
Post a Comment
I love comments!